Segmentation is where all the hard work of data collection and unification turns into value. It’s how you identify your fans, customers, or audience members in meaningful groups — and then take action on those insights. Whether you’re sending targeted communications, analyzing audience behavior, or sharing with ad platforms, segmentation is where data becomes strategy.
Let’s walk through how segmentation works in the CDP — no code, no SQL, just results.
🧩 Configuration: Laying the Foundation
Before you can build segments, the segmentation engine needs to know what to work with.
This setup is handled by the Customer Success team during your onboarding or whenever you add new data sources. With the introduction of the new segmentation engine, the Story-Based Segmentation (SBS), users are also able to configure any source-related or calculated segmentation attributes independently. You won’t need developers or consultants to use segmentation - the technical part is already done for you.
Regular Admins also have the ability to:
- Configure any source-related or Custom Calculated Attribute (only in SBS)
-
Rename attributes for clarity (Field Alias)
-
Organize attributes into Categories (e.g. Ticketing, Email, Profile)
- Change free text values to dropdowns and view what values are available in the database for Dropdown attributes
-
Toggle visibility of attributes in the UI
This keeps your dropdowns clean and your segmentation experience focused. These options are available under Admin / Segmentation.

🧠 Defining Conditions with Attributes
Conditions are the rules that decide who belongs in a segment. They’re built using the available attributes, which can be sorted in three main categories.
1. Source-Related Attributes (Bootstrapped attributes)
These are based on raw data from your connected systems - like ticketing, e-commerce, or CRM. Any field from any of your sources can be used as a segmentation attribute. Example:
“Bought a match ticket for Event X”
2. CDP-Defined Attributes
These are calculated or aggregated behaviors tracked within the CDP.
Example:
“Opened last email”, “Opted in to marketing”, "Belongs to another existing segment"
3. Custom Calculated Attributes
These are advanced logic-based attributes built during onboarding to reflect your business goals. Customers using SBS can configure these themselves. Example:
“Attended 5+ away matches and bought merchandise”
💡 Story-based Segmentation is available to a selected group of customers. The upgrade of the rest of the customers is ongoing. With questions, reach out to your Customer Success Manager.
✍️ Creating a New Segment
Building a segment is straightforward and entirely visual.
You start by clicking on Segments on the menu and then on Create New Segment:
-
A segment name (each segment will get a unique ID as well once saved)
-
An optional description
You then define the audience using a visual rule builder. The system lets you combine conditions using simple “AND” / “OR” logic, create nested rule groups, and apply filters without ever needing to write a query.
As you build your segment, click Preview at any time to see how many profiles match your criteria. This gives you real-time confidence in the quality of your audience before launching any actions.
Setting Values with No-Code Controls
Depending on the type of attribute, you’ll see different input controls:
-
Dropdowns (e.g. for event names) (Dropdowns display a maximum of 100 values (e.g. event names). If there are more, the UI switches to a free-text input for performance reasons. Need a higher limit? Contact support via the chatbot.)
-
Radio buttons (e.g. Yes/No)
-
Date pickers
-
Free-text fields
-
Number inputs
You can use condition types like:
-
Equals,Not equal -
Contains,Starts with,Ends with -
Between,Greater than,In,Not in -
Empty,Not empty
You can also negate any condition (e.g. "Not opted in") to include or exclude specific groups.
🌀 Segment Types: Ad-Hoc vs. Recurring
When saving a segment, you’ll choose between two formats:
🔹 Ad-Hoc Segment
This is a static snapshot in time. The audience it contains won’t change unless you manually re-run or edit it. Ideal for one-time reports or exports.
🔁 Recurring Segment
This is a dynamic segment that updates automatically on a schedule — daily, weekly, monthly, or yearly. It’s perfect for use cases like birthday emails, event countdowns, or re-engagement campaigns.
You can define:
-
Start and end dates (to stop recalculation after a specific event or campaign)
-
Update frequency (daily is most common)
For example:
A recurring segment for “Fans with a birthday today” will update every morning to reflect that day’s birthdays — no manual work needed.
✏️ Editing Existing Segments
You can always edit the rules or schedule of both an ad-hoc and a recurring segment — for example, update the filters or change the end date.
However, it’s important to know:
Ad-hoc segments will run as you save it and update immediately.
Recurring segments don’t update immediately after edits.
Instead, the changes take effect the next time the segment is scheduled to run.
So if you modify a daily segment at 4 PM after it already ran that morning, the updated logic won’t apply until the next day’s run.
🔎 Exploring Segment Details
Clicking on a saved segment brings you to the Segment Details view — a helpful page for reviewing and managing what you’ve built.

Here, you’ll find:
-
Total number of matching profiles
-
Segment rules and logic
-
Creation and Last modified date
-
Export options to CSV
- Indication whether the segment is actively shared with any 3rd party tool, such as Meta or Google Ads
Under the Profiles tab, you can even see a list of profile names and emails in the segment. This lets you validate your logic, troubleshoot, and confirm whether someone should (or shouldn’t) be included. There’s also a search function to find individual profiles quickly.
📤 Exporting Profiles to CSV or External Platforms
Sometimes you’ll want to take your segment data outside the CDP — and that’s easy too.

From the Segment Details page, you can:
-
Export matching profiles as a CSV
-
Choose which profile fields to include
-
Use the data for reporting, analysis, or import into other systems
While Data Talks encourages working within the CDP for consistency, exports are there when needed.
Segments can also be shared directly to connected platforms like:
-
Google Ads, Meta, and X (formerly Twitter) — for building custom and lookalike audiences. For Meta, you can configure multiple Ad accounts as well to share to simultaneously
-
Loyalty apps — to reward certain groups
-
Mobile apps — to send targeted push notifications
-
Marketing automation tools — for advanced workflows

These integrations turn your CDP into a powerful activation engine on top of the in-built channels, ensuring your audience strategy is aligned across every tool you use.
⚡ Triggered Actions: Set It and Forget It
Segments can trigger automated communications, emails and SMS as soon as someone enters them. Learn how to configure Triggered Actions and what the most typical automated newsletter types are HERE.

🤖 AI Assistant: Smarter Segment Suggestions
Not sure where to start? Let the AI help.
Inside the segment builder, switch to the AI Assistant tab and describe your goal in plain language, such as:
"I want to sell more family tickets for Saturday’s game."
The assistant will suggest relevant combinations of filters — up to three ideas at a time — based on the attributes available in your system. You can accept, reject, or adjust the suggestions as needed.
🚀 Story-Based Segmentation
In 2025 Data Talks has released a new, next-generation segmentation engine called Story-Based Segmentation.
This segmentation engine is:
-
Truly real-time, updating segments as events happen
-
Fully self-service, without needing setup from Customer Success
-
More user-friendly, allowing deeper drill-down and richer visualizations of your audiences
This feature is continuously evolving and will bring even more power and simplicity to your segmentation work.
Story-Based Segmentation (SBS)
The next generation of segmentation in the Data Talks CDP.
Overview
Story-Based Segmentation (SBS) is the new segmentation engine in the Data Talks CDP, designed for real-time audience creation and greater flexibility.
It powers all segmentation for new customers and is being rolled out gradually to existing users.
While the look and feel of the standard Segmentation Builder remains familiar, the new engine introduces a completely redesigned backend — the Segmentation Admin — where users can define and manage segmentation attributes freely, without technical support.
What’s New
-
Real-time updates: new ticket purchases, events, and interactions are instantly reflected in segments.
-
Automatic data access: every incoming data source appears in segmentation without manual configuration.
-
Custom segmentation attributes: build your own metrics and logic directly in the interface.
-
Dynamic dates: create rolling conditions like “tickets in the next 7 days” or “birthdays next month.”
-
Calculated fields: new calculation options such as AGE, LATEST, and LAST make it easy to set up use cases like “days since last purchase”.
-
Out-of-box system attributes: automatically available for campaigns, profiles, and data sources.
Two Interfaces
SBS introduces a two-part structure to segmentation:
1. Segmentation Builder (Front-End)
The user-facing builder where you create segments using:
-
AND / OR logic
-
Grouping and negations
-
Real-time validation and preview
This interface works the same way as before, ensuring a smooth transition for existing users.
2. Segmentation Admin (Back-End)
A new configuration interface that allows you to:
-
Define which attributes are available for segmentation
-
Combine attributes from multiple data sources
-
Create custom and calculated segmentation fields
-
Manage attribute visibility and naming
This UI gives data and marketing teams complete control over the segmentation framework — without needing engineering input.

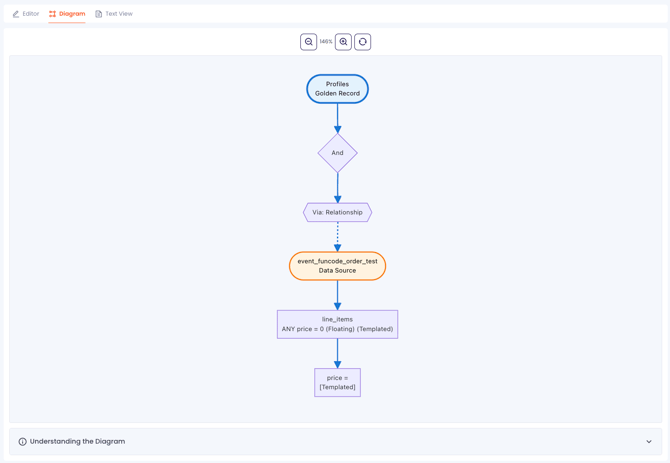
-
Rule visualization: All segmentation rules now include a visual representation of the attributes involved and their relationships, making complex segments easier to understand and validate. This diagram is available under the Admin / Segmentation pages.
Example Use Cases
-
Supporters who have tickets for upcoming games in the next 30 days
-
Fans who attended more than two matches this season
-
Profiles with birthdays today

-
Members who bought merchandise but haven’t attended a game recently
-
Supporters who clicked on a campaign URL but did not complete a purchase
- Profiles who belong to a data source or another segment
- Supporters who attended games of Thursdays (or any other day of the week)
New settings
Story-Based Segmentation is by default case insensitive: values such as "budapest" and "Budapest" will be counted as identical. You can however update the setting using the Cogwheel in the segment-builder.

Day-of-Week Segmentation
You can now filter and segment profiles based on actions that occur on a specific day of the week — for example:
-
“Supporters who attend games on Thursdays”
-
“Fans purchasing tickets on weekends”
This enables more detailed audience insights and allows for weekday-based campaign planning, perfect for optimising communication around matchdays or recurring engagement patterns.

Combined Attributes in Segmentation
You can create a combined attribute from two existing fields — for example:match date + match name → 2025-10-29 || Data Talks FC vs. Data Silent FC
This feature is especially useful when your data source (e.g., ticketing system) doesn’t include a unique match ID. By combining attributes, you can easily identify and segment data related to specific events or matches.
How it's built in the Custom Rule Builder:

How it appears when building a segment:

Release 1.111
Random Sample size selection: SBS also allows users to create a segment with only a randomly selected sample of everyone matching the segment's conditions. E.g.: a user can set a segment of 1000 profiles of those who have attended at least 1 game this season. This is particularly useful to handle cases such as survey-invitations or creating control groups for campaign performance measurement.
Availability
Story-Based Segmentation is available for all new customers by default.
Existing customers are being migrated gradually — your Customer Success Manager will inform you once your organization is ready.